Make Your System Machine Learning Enabled
In today's digital age, it's effortless to find tutorials on various machine learning concepts. However, bringing these theories to life with practical applications can enhance the overall learning experience. To make this possible, it's essential to equip your computer with the necessary tools to run experiments.
In this blog, we'll walk you through the steps to prepare your computer for machine learning practices. There are several ways to make your system Ml-enabled, but we'll focus on the most popular and user-friendly method: using Python3 with Sublime Text 3. Python is the most widely used programming language for machine learning tasks, while Sublime Text 3 is a code editor that allows you to write and run machine learning algorithms.
Key takeaway from this blog
- Installation Of Python3 on Windows, Linux & Mac operating systems
- Installation of Sublime Text 3 on Windows, Linux & Mac
- Installation of pip/pip3
- Installation of Numpy, Scipy, Pandas
- Installation of Machine Learning Frameworks
- Installation of Deep-learning Framework
- Installation of Visualization tools
Let’s get started without any further delay!
Installation of Python3
There are many versions of python-3 that have been released till now. But, we will go with version 3.6 as later versions of python3 have compatibility issues with some famous libraries that are important for machine learning.
Installation On Windows
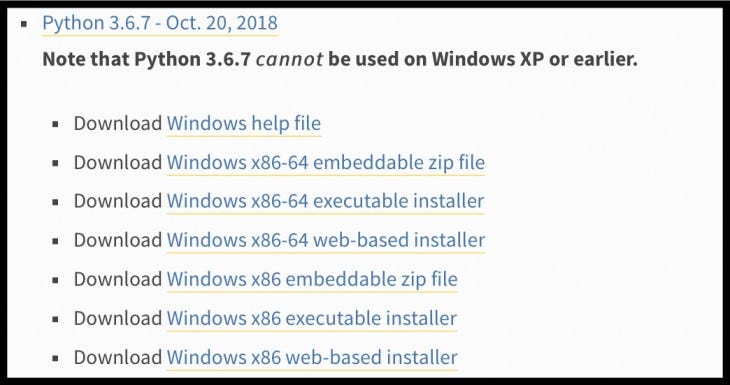
Step 1: Visit the official website of python, and download the executable installer. You can use any version of the format 3.6.x. Note: If your system has a 64-bit processor, install the x86–64 executable installer. Otherwise, install the x86 executable installer.
Step 2: Once downloaded, click on the file, and one popup will come like the below image. Make sure to select the Add Python 3.6 to PATH option.
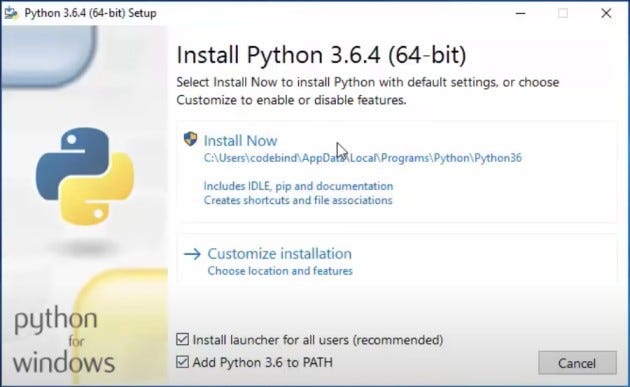
Step 3: We can either proceed ahead with Install Now. To change the location of installation, proceed with Customize installation. We will keep the path of installation shorter, so let's select Customize installation. After that, a screen like the below image will appear. Make sure all the check-box is right-marked ✔.
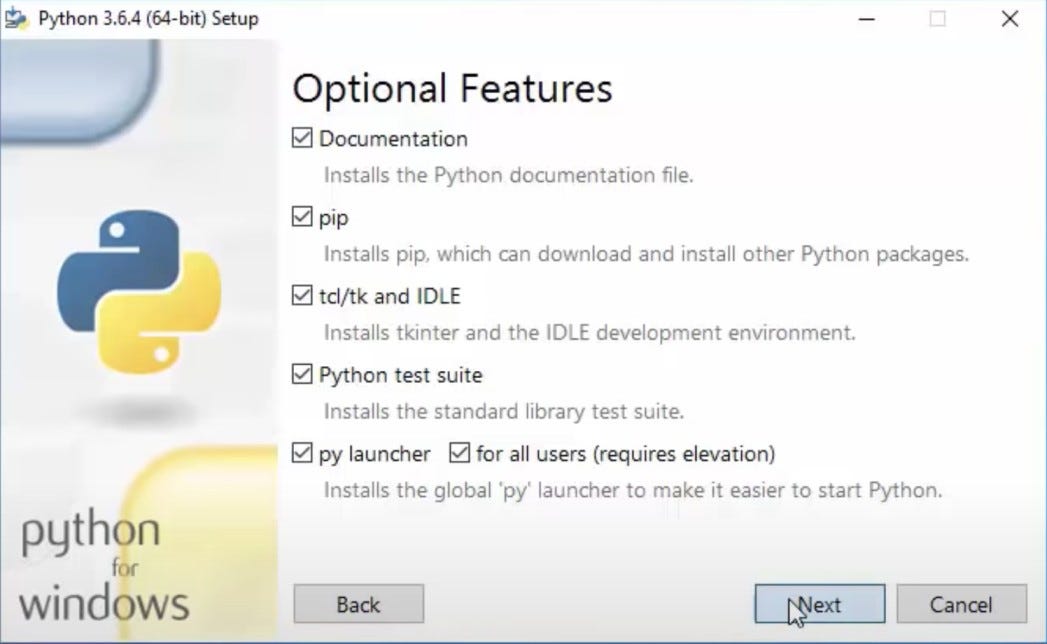
Press the Next button, which will lead you to the below image.
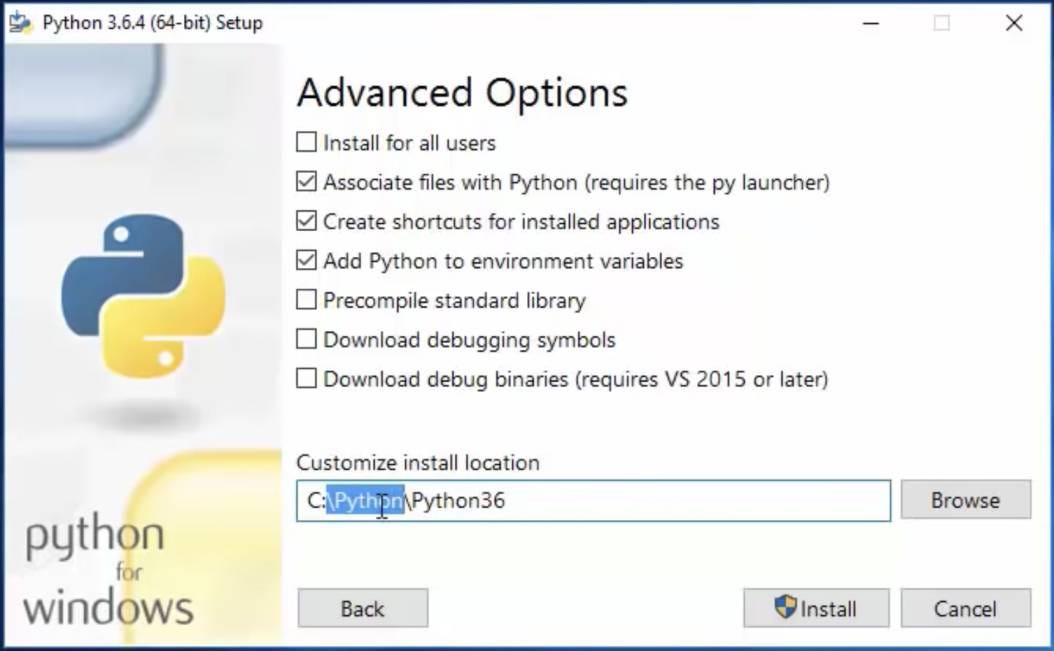
Change the path to C:\Python\Python36 (You can choose any other path as well).
Step 4: Make sure to select the Install for all users section, and click the Install button.
Step 5: To check the installation, open the command prompt by typing cmd in the Cortana search bar and press Enter. In the command prompt, type python and then Enter. It will open the python shell in the command window. To exit from this shell, press “Ctrl + Z” and then Enter.

We are done with the python installation in windows OS.
Installation on Linux (Ubuntu) or macOS
Python is installed by default. To check the versions, open the respective terminals and type python3. It will open the python environment with the Python3 version. To exit, press “Ctrl + D.”

Now, we have Python3 Installed in our systems.
Installation of Sublime-text-3
Visit the official page of Sublime-text-3

Download the file as per the System OS and then install it. This is the editor that we are going to use.
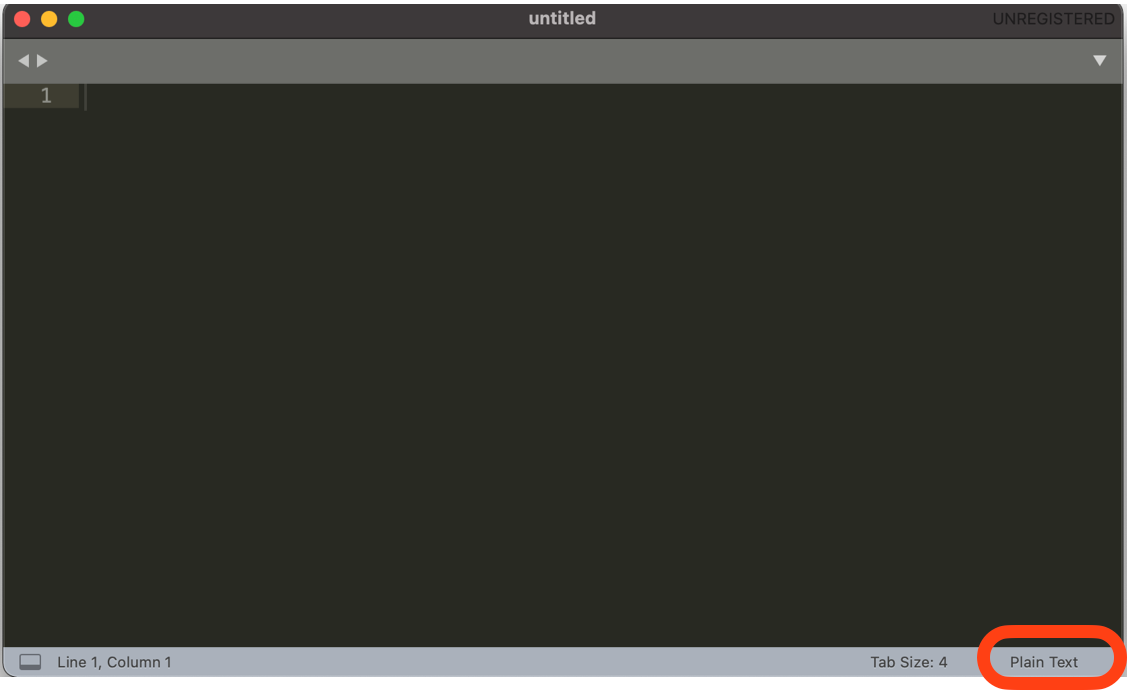
Open the Sublime text 3 editor and click on the Plain Textoption and select python. Write python code here and save it by Ctrl + S. Let's say the name of the saved file is first_code.py. To run this program:
Step1: Open the command prompt in the case of Windows or terminal in the case of Linux or macOS.
Step2: Using the cd path-of-the-saved-file command, change the current directory of the terminal or command prompt.
Step3: Run command: In the command prompt, python first-code.py or in the terminal, python3 first-code.py. It will run your code.
Running Command Prompt As Administrator on Windows
Step1: In the windows search bar (Cortana search bar), type cmd.
Step2: Right-click on the top search result and select Run as Administrator.
Step3: Allow the pop-up by clicking on the “yes” option.
Installation Of pip/pip3
On windows
If you have followed the above instructions for the installation of python, pip will already be installed there.
- Step 1: Check if PIP is there or not? Open the command prompt, and type,
pip help. If this responds, it means pip is already there, and you can skip later pip installation steps. - Step 2: Download PIP get-pip.py by visiting the site:- https://bootstrap.pypa.io/get-pip.py. Right-click on this site and then select
save asthe option, save get-pip.py at any location, and remember it. - Step 3: Run the command prompt as administrator.
- Step 4: Use the ‘cd’ command followed by a folder name to navigate to the location of the get-pip.py file. This is the folder we previously used as the download location. Then run,
python get-pip.pyThis will install the pip. - Step 5: Check the version of PIP
After installation, type pip -- version. This command returns the current version of the pip. If you receive any error in installation, repeat the steps.
On Linux
As we are using python3 everywhere, so we will be proving the command for pip3 here.
- Step 1: Open the Terminal and run the command,
sudo apt install python3-pip. It will ask for the system password. Put up the password and press Enter. This will install the pip for python3. - Step 2: Check the version of pip,
pip3 — version
On macOS
The installation process will be similar to the steps that we followed for the Windows machine but pip3 will replace pip.
- Step1: Check if PIP3 is there or not? For that, run the command, pip3 help. If this responds, it means pip is already there, and you can skip later steps of pip installation. If not, then
- Step 2: Download PIP get-pip.py by visiting the site: https://bootstrap.pypa.io/get-pip.py. Right-click on this site and then select
save asthe option, and save get-pip.py at any location but remember the location. - Step 3: Open the macOS terminal and navigate to the downloaded location using the ‘cd’ command which is the short form of ‘Change Directory.’
- Step 4: Run the get-pip.py file with python using the command,
python3 get-pip.py. This will install the pip. - Step 5: Check the version of PIP3.
After installation, type pip3 -- version in the terminal. This command returns the current version of the pip3.
If you receive any error in installation, repeat the steps.
Installation of Numpy, Pandas, Scipy
Before moving towards the installation of these libraries, let’s quickly know their usefulness.
Numpy: Numpy is a math library for scientific computing in Python. It computes the matrix/mathematical computation very effectively and efficiently. It is also used to extract statistical inferences from the data and hence also used in data science.
Pandas: Pandas library is used to store the data in Excel-like table format. Manipulations, analysis, and search query operations are very efficient even for 100s of millions of rows. It stores data in the format of DataFrame ( A type of Data structure).
The term Pandas is derived from the word Panel Data which is an Econometrics from Multidimensional data.
SciPy: SciPy library is highly dependent on the Numpy library and provides convenient and fast N-dimensional array manipulation for mathematics and science.
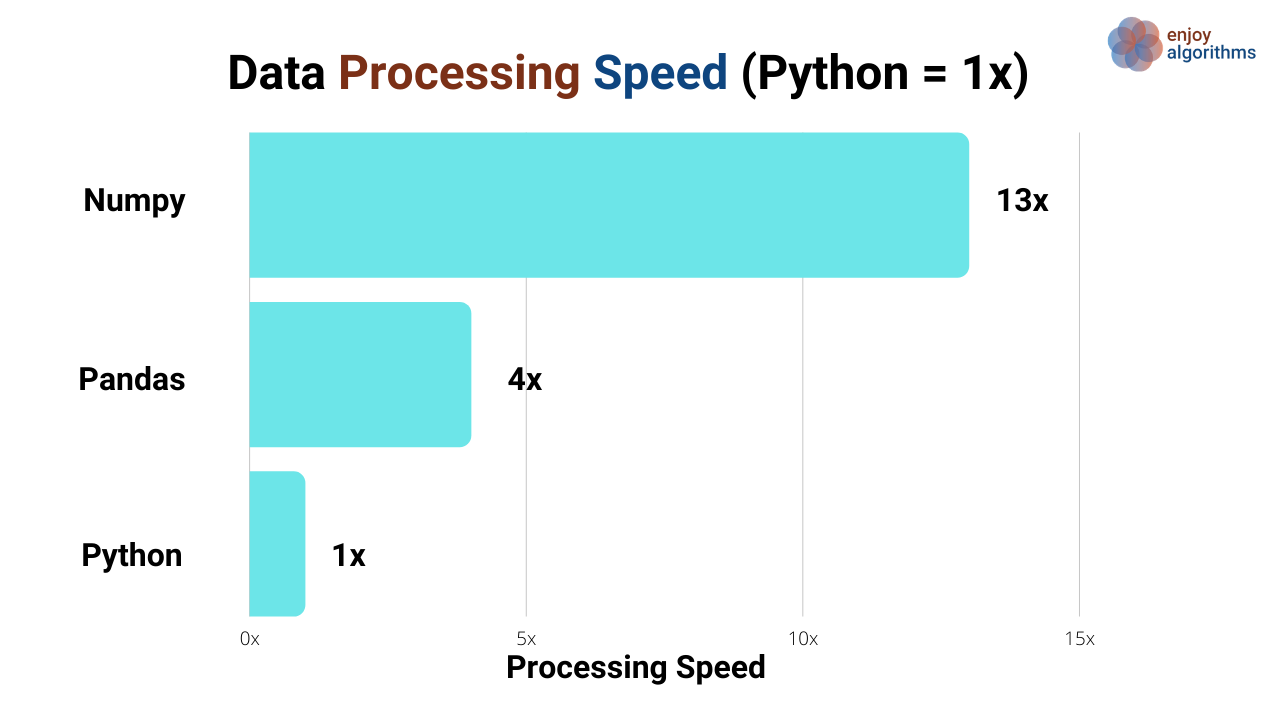
If we compare the processing speeds of Python, Pandas, and NumPy, we will find that Numpy is the true dominator and provides faster calculations.
All of these installations can be done by using pip commands that we will have to run in command prompt (in case of windows) or in the terminal (in case of macOS or Linux). Please make sure that you are connected to the internet.
For Windows
Run these commands sequentially in the command prompt, python -m pip install -- upgrade pip. This will upgrade the version of pip in the system.

Now run the command, pip install numpy

This will install the NumPy library. To validate the installation, in the command prompt, type python.
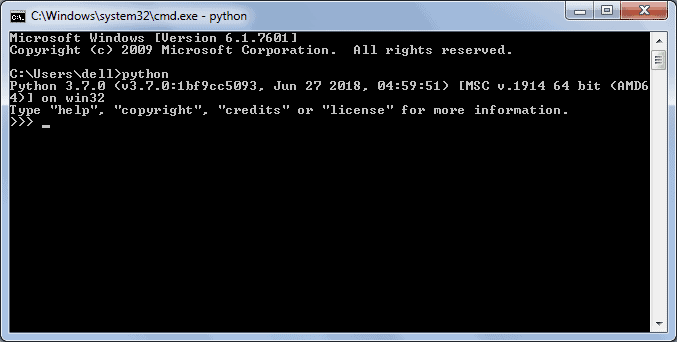
This will open the Python shell (Above image). Now type, import numpy. If this responds ( Successfully executed without giving any error), then NumPy is installed.

Press Ctrl + Z to come out from the python shell.
Now type the command, pip install pandas

This will install the Pandas library. Again to validate, we can open the python shell and check with the command import pandas and if that responds, it means pandas has been installed. Make sure to come out of the Python shell by pressing Ctrl + Z. Now in the same command prompt, type the command, pip install scipy. This will install the scipy library, and with the same process, installation can be validated.
For Linux & macOS
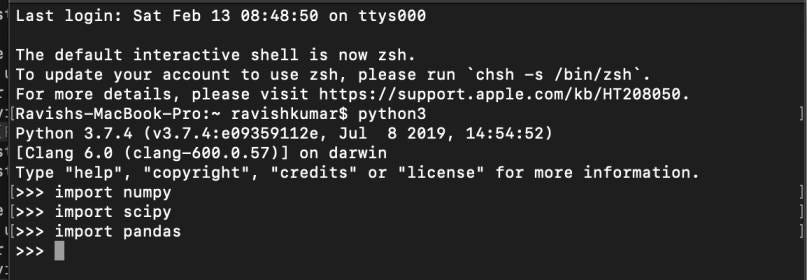
Run the below command, and it will install all three libraries, sudo pip3 install numpy,. This will install all three libraries. To verify the installation, run the command python3 in the respective terminal. It will open the python shell, as shown in the below image.

Now, type commands, import numpy. If this responds, then the installation is complete; otherwise, repeat the process. Similarly for pandas and scipy, if commands, import pandasand import scipy responds means the library is installed. If not, the process should be repeated.
Now we have the basic libraries installed in our systems. Let's start installing frameworks.
What is Machine Learning/Deep-Learning Framework?
A tool or interface which provides pre-built optimized components that helps to build complex machine/deep learning models with just a few lines of code.
Installation of Machine Learning Frameworks
Scikit-learn is a machine learning framework that provides optimized functions using which we can build complex models easily.
Installation on Windows
Open the command prompt as an administrator and run the command, pip install scikit-learn. This will install the Scikit-learn framework in your windows system. To check the installation, type the command import sklearn in the python shell of the command prompt. If this responds, it means scikit-learn is installed.
Installation on Linux or macOS
From the terminal, run the command, sudo pip3 install scikit-learn. If it asks for authentication, provide the password, and Scikit-learn will be installed. To check the installation, open the python shell in the terminal, and type the command import sklearn. If this responds, means scikit-learn is installed.

Installation of Deep-learning frameworks
There are several deep-learning frameworks among which TensorFlow and PyTorch are very famous. We will go with TensorFlow and Keras (an interface for TensorFlow) as it is a mature & easy-to-use framework with a lot of online supports available.
Installation on Windows
We will be going to install a specific version of Tensorflow 2.2. Open the command prompt with administrator permissions and run the command, pip install tensorflow==2.2. This will install Tensorflow of version 2.2.
If your system has Graphic Card then you can try the GPU version of TensorFlow which is very fast as compared to the CPU. But, Install/Update the Nvidia driver, Cuda Toolkit, and cuDNN before installing TensorFlow for GPU. Command, pip install tensorflow-gpu==2.2”will install the GPU version of tensorflow.
To check the installation, open the python shell in the command prompt and type, import tensorflow. In case if you will not be having ‘msvcp140_1.dll’, you will get an error in importing tensorflow.
ImportError: Could not find the DLL(s) ‘msvcp140_1.dll’. TensorFlow requires that these DLLs be installed in a directory that is named in your %PATH% environment variable. You may install these DLLs by downloading “Microsoft C++ Redistributable for Visual Studio 2015, 2017 and 2019” for your platform from this URL: https://support.microsoft.com/help/2977003/the-latest-supported-visual-c-downloads
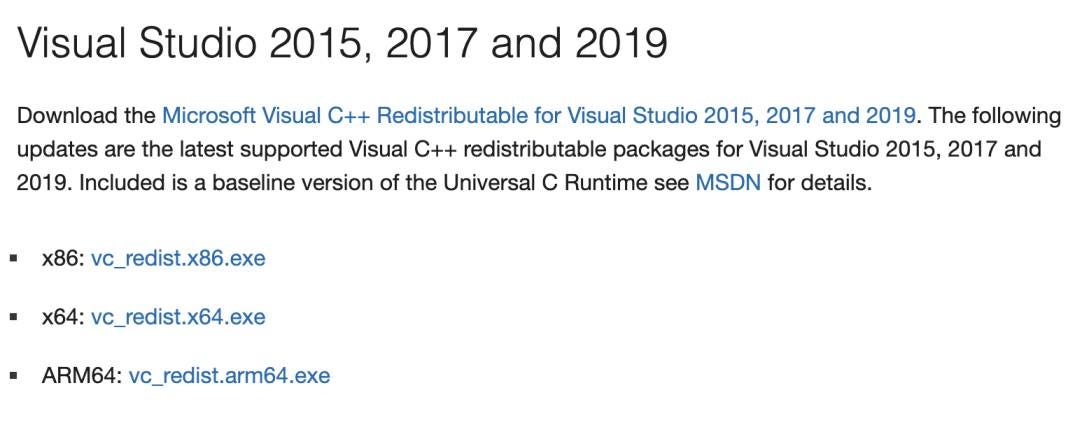
To resolve this error, visit the link given above and download the vc_redist.x64.exe and install it. After this installation, recheck the importing of tensorflow in the python shell. If this responds, means Tensorflow got installed. To install Keras, run command, pip install keras. This will install Keras library.
Installation on Linux or macOS
Open terminal and run command, sudo pip3 install tensorflow==2.2 OR sudo pip3 install tensorflow-gpu==2.2 ( For GPU Systems with Cuda toolkit installed)
This will install TensorFlow and then run sudo pip3 install keras, which will install Keras. Please do not forget to check the status of installation by importing the library into the python shell. Note: Importing tensorflow can give some warning that can be ignored.
Installation of Visualization Tool
If you know the data very well, you can play with it smartly and can build better models. There are certain libraries or tools which help in visualizing the data. Matplotlib & Seaborn are two important and easy-to-use visualization tools.
Matplotlib: A comprehensive library for creating static, animated, and interactive visualizations in Python. There are different versions of matplotlib, but we will install 3.3.3 which is a stable version.
Seaborn: A matplotlib based Python data visualization library provides a high-level interface for drawing attractive and informative statistical graphics.
Installation on Windows
Here we will be going to install a specific version of matplotlib, 3.3.3. Open the command prompt with administrator rights and run the command, pip install matplotlib==3.3.3. It will install matplotlib of the release-version 3.3.3. Similarly, for Seaborn, pip install seaborn will install seaborn.
Installation on Linux or macOS
Open a terminal and run the following command, sudo pip3 install matplotlib==3.3.3,. It will ask for password authentication. After providing the password it will install both the libraries.
Now, we will be able to run all the standard ML programs on our PCs.
If you have any ideas/queries/doubts/feedback, please share in the message below or write us at contact@enjoyalgorithms.com. Enjoy Learning, Enjoy Machine Learning!
Share Your Insights
More from EnjoyAlgorithms
Self-paced Courses and Blogs
Coding Interview
OOP Concepts
Our Newsletter
Subscribe to get well designed content on data structure and algorithms, machine learning, system design, object orientd programming and math.
©2023 Code Algorithms Pvt. Ltd.
All rights reserved.
